Showing posts with label Household. Show all posts

September 16, 2012

The Bulletin Board


I could really use everyone's help!! Please click below & VOTE for my weeknight meal recipe, Baked Ham & Cheese Sliders! And please SHARE!! I could use all the votes I can get! 

http://www.mrfood.com/voting/Weeknight-Meal/blogger/Faulkner


Welcome to this week's Bulletin Board!!

This week, I'm sharing my Cheddar Bacon Pork Chops.  


Here are my favorites from last week.

No Bake Chocolate Peanut Butter Balls from A Little Nosh


Chalkboard Command Center from Just Us Four


15 Real Food Homemade Dressings from SuzyHomemaker


Thanks to everyone who shared last week!  I can't wait to see what all you pin to the board this week!!


Never miss a thing, follow me on Facebook!

MrsHappyHomemaker


Shared with these great blog parties!

September 14, 2012

Homemade Liquid Laundry Detergent (Plus a FREE printable label!)


Buying laundry detergent can put a big dent in any budget, and making my own is one way where I save the bucks.

If you bought 5 gallons worth in the store, you'd be paying around $100!! Maybe even more than that depending on the brand.  But, when you make your own - you can make 5 gallons for less than $2!!  

When I buy all the ingredients for the first load - it comes out to $6.95 - but there is still lots of borax & washing soda left, so all that I need to buy for the next few batches is the Fels Naptha soap (which is really cheap!).


That makes 20 gallons for under $10!


Making your own detergent accounts for some enormous savings!

I buy my ingredients at WalMart, which I've found to be the cheapest place to buy them at.  Let me break down my costs for you.

  • Borax - $2.99
  • Washing Soda - $2.99
  • Fels Naptha Soap - $0.97

You can also purchase the ingredients on Amazon, but I've found that they are more expensive this way for the borax & washing soda.  However, the Fels Naptha price isn't bad on there.

You can also use essential oil for scent, but that's completely optional.  The essential oil adds nothing to the cleaning power, but does give it a nice smell if you'd like to have it.  If you do want the added scent, I really like using orange essential oil because of the clean smell that it has.  Plus, it's also the one that I recommend for using in my homemade carpet powder. If you purchase it on Amazon (which has a great price on it), it runs about $5.00 for 4 ounces.  You only need 1/2oz to 1oz for a 5 gallon batch (depending on how much scent you want) so it lasts for a good while, and doesn't add much to the final cost.  Still way cheaper than store bought.

If you're a Tide detergent lover - check out the tip at the bottom of the post!

So, are you ready to make your own laundry detergent & rack up the savings? I'll walk you through how I make mine.

Here's what you need:


  • Borax
  • Arm & Hammer Super Washing Soda (NOT baking soda)
  • 5.5oz Fels-Naptha Soap (you can also use Zote or castile soap - about the same amount, you don't have to be exactly precise)
  • water
  • 5 gallon bucket


First, you grate up your Fels-Naptha soap.  Or you can substitute Zote (which will make your laundry detergent pink for all your girly-girls) or pure pure castile soap.


Add the soap shreds to a pot with 4 cups of hot water.  Put the heat on medium-high, and stir until completely melted - about 10 minutes.


Fill up a 5 gallon bucket halfway with hot water.  Pour in the melted soap mixture.  


Then, stir in 1 cup of borax & 1 cup of washing soda.


If you're using the essential oil, now is the time to add it.  You add in 1/2oz to 1oz, depending on how scented you want it.  Although, I never really measure it anymore - I just shake in enough drops to where I feel satisfied, and stir.


Now, fill up the bucket with warm water all the way to the top - and stir again.  If you don't have a utensil long enough to reach the bottom, just put on a pair of rubber dish gloves beforehand.


Snap on a lid, and let it sit for 24 hours to gel up.  Note: it will be more of a gloppy gel than purely gel, and this is completely normal - and what it should look like.

At this point, you can divide it up between different containers (empty laundry detergent containers, milk jugs, etc).  I prefer to save 1 laundry detergent container, & refill it as needed to save on space.

A lot of people like to dilute it even more at this step (therefor turning the 5 gallons into 10 gallons) - filling their container halfway with the gel & then the other half with water.  You can choose to do this if you like.  However, my family seems to produce pretty dirty clothes, and I prefer to not dilute mine further.  I feel like the cleaning power is stronger this way. 


For HE front loading washers, use 1/2 cup for a large load.  For regular top-loading washers, use 1 cup for a large load.  You can use stain removers or oxi-clean with this too if you would like - just the same as you would use them with the detergent you buy in the store.

I love this detergent, and have compared it to store-bought & I can't tell a difference.

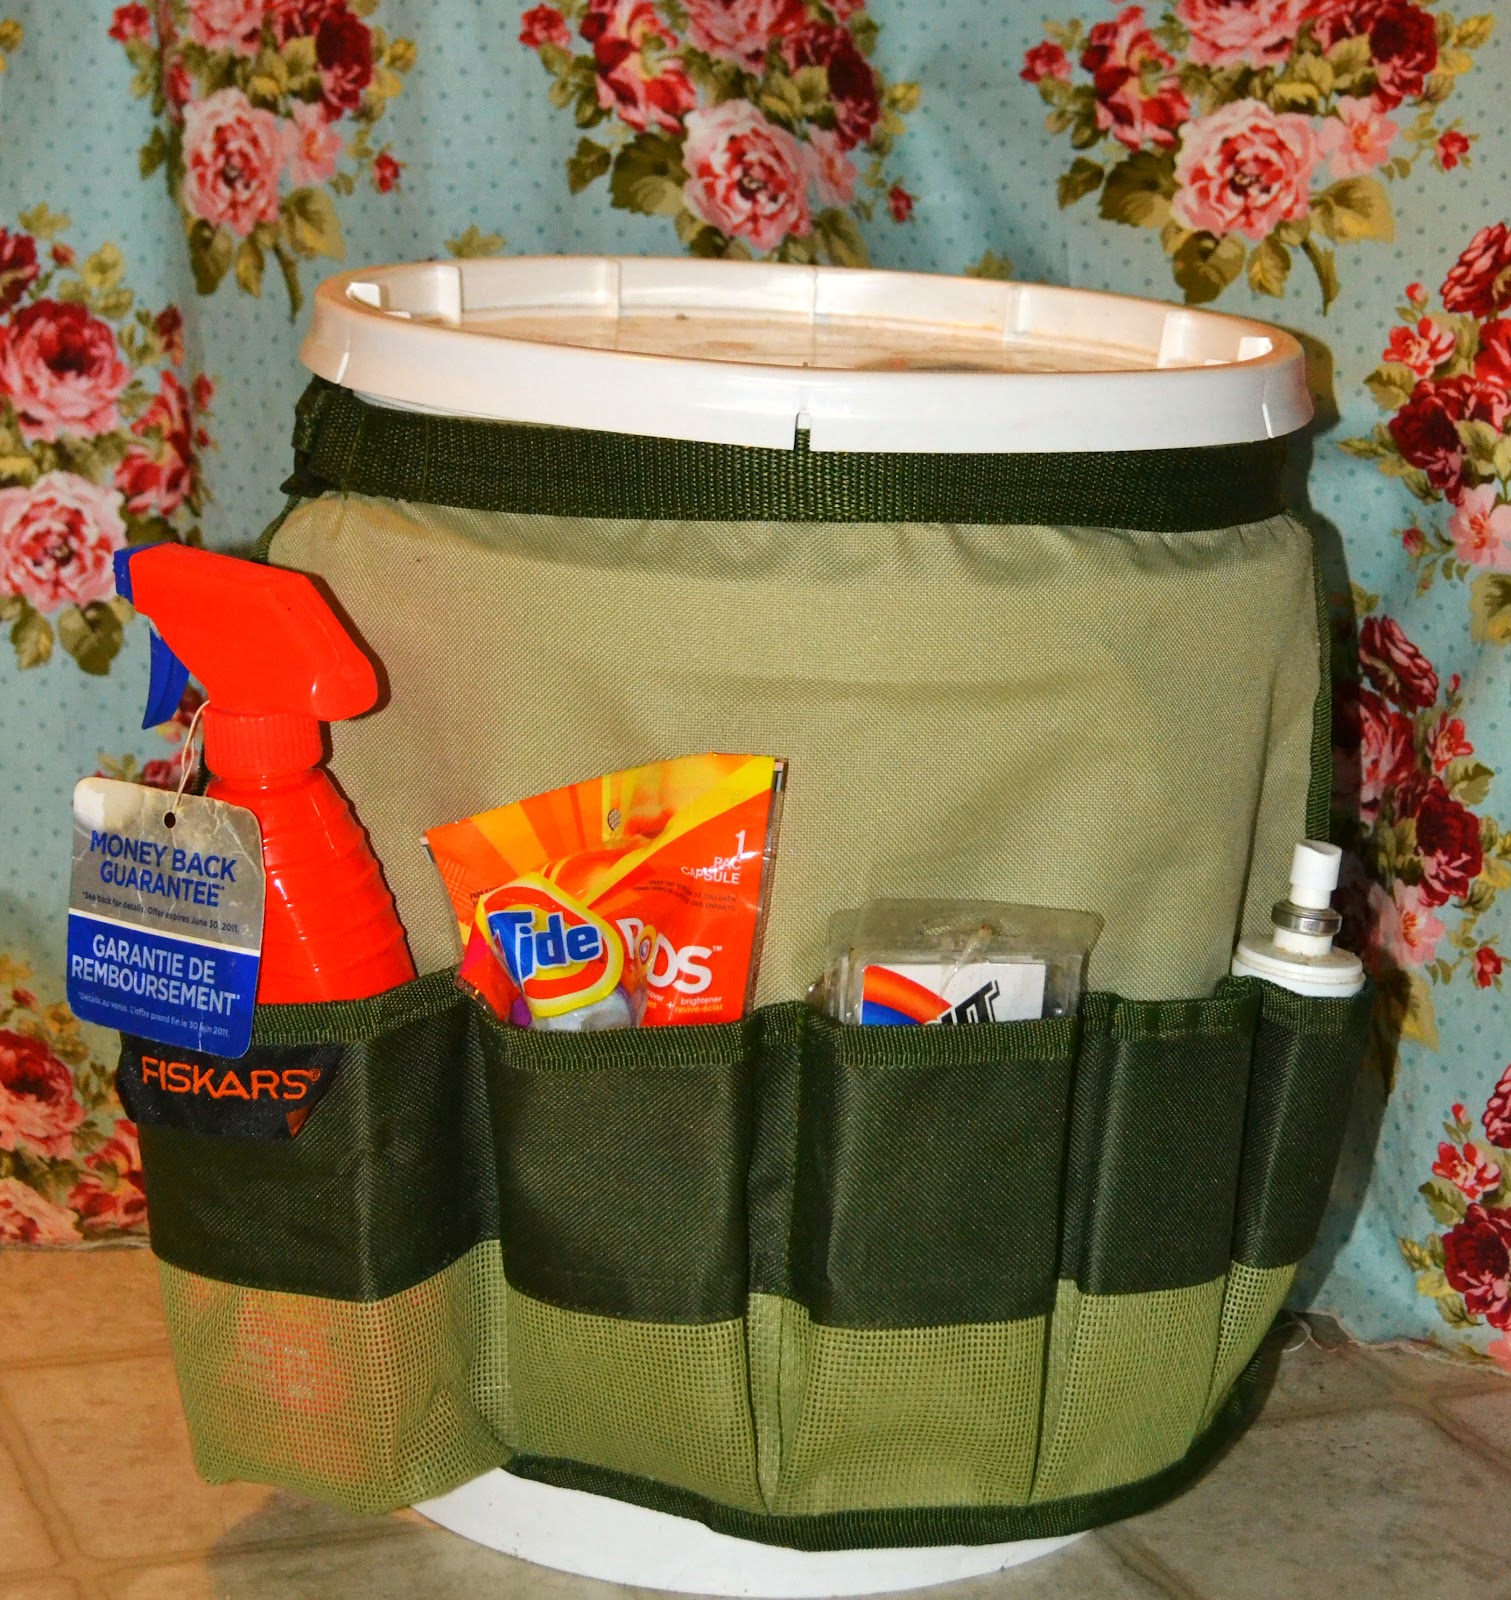
I have attached this neat bucket organizer that my mother gave me around mine.  I use it to organize laundry detergent samples, stain remover, etc.  


You can leave your homemade detergent in the bucket, or you can split up the large batch between empty detergent containers, milk jugs, etc.  

I created this pretty printable label for your homemade detergent containers too.  Just right click to save to your computer to print, or use the printer friendly button at the end of this post.  Enjoy!!


**Per a readers tip, if you are a TIDE lover - use a little liquid TIDE in your homemade detergent for extra stain-fighting power!


Never miss a thing, follow me on Facebook!


MrsHappyHomemaker


Shared with these great blog parties!

September 6, 2012

5 Tips to Get-it-Together When Lunch Making


With kids returning to school, we parents are busier than ever getting our families organized.  We are purchasing school supplies, lunch supplies, making calendars of the family member’s activities, coordinating childcare and bus schedules… basically trying to figure out how exactly are we going to get it all done.

Making a variety of school lunches that are healthy and your kids will actually eat? That’s for the pros. Not! I might help parents make fresh school lunches for a living but I assure you that you too, can get-it-together in 10 minutes or less on your own.

I have 3 children and I know first hand how difficult it can be to find something suitable for everyone to eat without becoming a short order cook. The thought of whipping up dinner 7 nights a week and packing healthy lunches might be a daunting task for many of you; but I can assure you that by implementing these 5 tips it will be easier than ever.

 1.   Make a plan.  Planning your meals and creating a shopping list to go with it will save you time and money on wasted food and unhealthy last minute drive-thru purchases. If the whole menu planning thing overwhelms you or you don’t know where to begin, you can always subscribe to a family friendly menu plan for a few cents a day.

     2.  Cook once, eat twice.  Are you firing up the grill? Cook extra or another meal all together, save it in the fridge and dinner is nearly made for another night.  That extra chicken breast no one ate? Great for lunch the next day in a sandwich, quesadilla, wrap or on a salad.  Boiling pasta or cooking rice?  Double it! Now you have ready-made food quick lunches and won’t have to boil water while having an infant or toddler on your hip -Not that I would know…


     3.  Have healthy snacks ready to go. Snacks are one of those things we always need to have on hand because our children seem to always be hungry. Find a few snacks that are easy to make or assemble and have them ready. You know kids are usually starving by the time they get home, so having healthy snacks on hand can be very helpful.

     4.  The freezer is your friend.  Once a week, I have a breakfast-for-dinner night.  While the waffle maker or griddle is out, I double even triple the batch.  By freezing your waffles or pancakes you now have instant homemade breakfasts ready to toast. Hate cleaning your waffle maker? Check out an easy way here. Have a picky eater who only eats peanut butter sandwiches? Make a whole loaf of peanut butter and jelly sandwiches and freeze the whole bag. Pull a sandwich out in the morning and it will be thawed out and perfect temperature for lunch. No icepacks needed.

     5.  Prep-Early.  Why not marinade, pre-assemble tomorrow’s lunch while you are making dinner?  Since you already have a messy kitchen, go ahead and prep-it-up!  When you get home from the grocery wash all your produce, chop and sort ready to pack in the lunch bags.   

I know what it’s like to pack lunches for a week the night before my c-section as well as making lunches daily with a baby on my hip while the other two are begging to raid the pantry.  I sometimes suffer from the meal-time scramble at my house! I’ve learned that with a little planning, lunches are assembled quickly and 30-minute meals can be made in a lot less time because I had the ingredients on hand.  Fresh lunches should be easy to make, don’t you think?


-- Laura Fuentes shows parents how to make fresh school lunches over at MOMables™.  A wife, mother of 3 and a lunch enthusiast who insists on healthy, wholesome food for her family.  
On her personal blog, Super Glue Mom, she writes about managing motherhood on a deadline.  She’s also a food contributor and recipe developer to numerous sites, and helps busy parents overcome the difficulties of cooking real food in a hurry. You can find Laura on Twitter and on Facebook and MOMables on Twitter, Facebook and Pinterest.


Never miss a thing, follow Mrs Happy Homemaker on Facebook!


MrsHappyHomemaker


Shared with these great blog parties!

July 24, 2012

Real California Milk Dairy Tour, Part 1


Recently, I had the opportunity of flying cross country from my little boonie town in North Carolina all the way out to California for a dairy tour hosted by the Real California Milk Advisory Board!  It made for an experience of a life time, and I wanted to share some of my trip with you.  

Now, I'm doing this in 2 parts because I just have so much that I want to share. Part 1 is what I'm bringing you today, detailing all the things we did - and then in Part 2, you will have a little food tour with me as I show you all the yummy foods I was served, all made with products bearing the Real California Milk seal. 

When I got off the plane, we grabbed a quick bite to eat, and then headed out to begin our tour.  Our first stop was for a delicious cone of ice cream at the Meadowlark Drive-Thru Dairy in Pleasanton, California.  They had some yummy flavors, but being a chocolate addict lover, I opted for a chocolate-vanilla swirl.  So good!


Our next stop was at the Alviso Adobe Community Park, where we had the pleasure of meeting & chatting with Johan Bartelink of Bartelink Dairy - a Dutch immigrant who came to the US in 1957.  Johan has spent most of his life as a dairy farmer, and it was a pleasure to hear him speak about his life & experiences in the dairy industry.  


Jahan Bartelink & his wife,


Visiting the Alviso Adobe Community Park, which used to be the Meadow Lark Dairy, felt like it took me back in time, and I didn't even need a flux capacitor to get there.  -wink-  We got to see how the dairies were operated in the past, and while lots of things have changed - one thing that hasn't changed is the extreme care that is given to the dairy cows, and the quality of the products put out by the California dairy families.  Yes, families.  Most of the dairies operated in California are done so by families - and that speaks volumes.


Take a look at this gorgeous old stove in the kitchen area of the dairy bunkhouse.  I would love to have this in my kitchen, so if any of you would like to send me one - I wouldn't object.  ;)


The evening ended with a beer/cheese pairing hosted by Chef Andy Wild & a fantastic dinner.  


The next day, we visited Fiscalini Farms, which is the home to the 2007 winner of the best extra mature cheddar cheese in the WORLD!   John Fiscalini is the forth generation dairy farmer behind it all, and the methods that he uses in both his dairy & in making his cheese really show in his final products.  


John Fiscalini in the cheese aging room


Growing up in farmland myself, I've been to many dairies over the course of my life - and his was unlike any I've seen.  The first thing I noticed when I arrived was the smell, or lack there of. As a country girl, I know how strong the stench can be at a dairy farm, and I was surprised by how it didn't smell like what I was expecting.  The reason behind this is John's environmentally friendly approach to running his dairy.  Several years ago, he invested in a methane digester.  To sum it up rather simply - it converts the cows waste into power to run the farm.  How cool is that?


The Methane Digester at Fiscalini Farms

The cows all seem so happy, loved, and are exceptionally cared for.  They have their own personal vet who comes every week to check on them, and is on call at all hours in case there is an emergency too.  

Aren't they cute?!  I may have started talking to them in baby talk, and gotten some funny looks from the cows.  


Moo-dels - Get it?   I'm such a comedian.

Inside his cheese making facility - we got a behind the scenes look at how his prize winning cheeses are made.  One advantage he has over the competition is his cheese maker, Mariano Gonzalaz - one of the top cheese makers in the world.


Seeing how the cheese was made was very intriguing, and even more intriguing was the way they were aged - or how long to be specific.  They are aged for 18 months in the aging room before they are packaged, which creates the rich flavor in their variety of cheeses.  


After we had seen everything, we got to divulge in a sampling of their cheeses.  Did I say sample?  I may have gorged just a little because they were absolutely delicious!  If I had an award to give, they'd certainly receive it because the hard work, dedication, & love that goes into their cheese making process is just so evident when you take a bite into their cheese.  Just incredible.

You can view Fiscalini Cheese's online store here.


On my third and final day on the tour, I visited Karoun Dairies & met with cheese maker Rostom Baghdassarian.


Karoun was started by Rostom's father, Anto - an Armenian immigrant who came to America to follow a dream & make a better life for his family.  For quite a while, every dollar he made making cheese he turned right around and put it right back into the company - making it what it is today, along with the support from his family & friends.


From all his hard work & dedication, the company has grown and now sells a variety of cheeses nationwide, including hand braided mozzarella (which was an absolute joy to watch being made), basket feta cheese, Labne, and grilling cheese.  


Karoun Dairies takes extreme measures to be sure their cheese is made in the cleanest of clean environments.  We put on some extremely fashionable suits before we were allowed to enter.  That's me, 4th from the left. Pure hotness, right?


While we toured their facility, we were able to see them hand braid their mozzarella cheese right there in front of us. Wow - they did it so fast!  It was like Speedy Gonzales, arriba, arriba!  It was truly amazing to watch.


You can view Karoun Dairies online store here.


While I was touring all this, I saw why California is recognized as the leading dairy producing state in the nation.  The climate, strict regulations put in place to protect the air & water quality, & the love and care given by the California dairy families influences all their products dramatically.  They certainly made a believer, and a fan, out of me.  After my experience there, I will most definitely be looking for that California Seal on my dairy products from now on.  How about you?



MrsHappyHomemaker


Shared with these great blog parties!

.

--> Related Posts Plugin for WordPress, Blogger...