Showing posts with label Snacks. Show all posts

September 11, 2012

Peanut Butter & Jelly Balls


Peanut butter & jelly sandwiches are the classic brown paper bag lunch. Unfortunately, they can get quite boring.  So, I set to take a different spin on them & jazz it up in all areas - flavor, presentation, & nutrition.  

These peanut butter & jelly balls aren't time consuming or difficult to make at all.  You can make a batch of them during the weekend, and store them in the refrigerator for quick lunches or snacks throughout the entire week.  


Another great thing about them is they freeze beautifully, so there's no pressure to use them up all at once.  You can even double or triple the batch for the freezer so you don't have to make them so often.  

Don't have a jelly lover in the house?  Feel free to omit the jelly if you want. Have a child with a peanut allergy?  Substitute soy or sunflower butter.


Peanut Butter & Jelly Balls

Ingredients:
  • 1 cup honey
  • 1-1/4 cup peanut butter (creamy,crunchy, or natural - take your pick)
  • 1.5 cups dry powdered milk
  • 3 cups quick or old fashioned oats
  • 4 tablespoons flax seed
  • 1/2-3/4 cup jelly or jam or your choice

Instructions:

Using an electric mixer, combine the first 5 ingredients in a large bowl.  Take a tablespoon worth of the peanut butter mixture and flatten it out by pressing it in between your hands making a 2" around 'pancake' shape.  Using your thumb, create a slight indentation of the center of your 'pancake'.  Drop 1/2 teaspoon of jelly into the indentation, and fold up the sides.  Create another small circle with the peanut butter mixture and press it down on the top of the ball, and roll it around in your hands to tighten & seal.  Repeat with the remaining dough & jelly.  Place the formed balls on a baking sheet lined with wax paper & place it into the freezer for 30 minutes, or until set.  Remove, & place the balls in a large container or resealable plastic bag & store in the refrigerator.


Never miss a thing, follow me on Facebook!


MrsHappyHomemaker


Shared with these great blog parties!

August 15, 2012

Bananaberry-Kiwi Kabobs


Here's a fun little recipe that I created for Life Around Home that involves absolutely no cooking whatsoever - just a little bit of assembly, and you're all done.  If you haven't checked them out yet - Life Around Home is the first ever social media driven television show, and I happen to be the cooking neighbor for it.  I share new recipes every Monday there, so make sure you go give them a 'like' so you don't miss out on anything.  There is something for everyone too - everything around home, that's what their about.

Now - back to your regularly scheduled recipe...  :)

These fruit kabobs would be a fantastic treat to jazz up the kid's lunchbox, appetizers for a party, or just a snack to serve up when you're hungry.  Kids & adults alike will love the fun colors, pretty presentation, & of course - the flavor!


Bananaberry-Kiwi Kabobs
scroll down for the recipe card designed by Life Around Home


Ingredients:
  • whole fresh strawberries, hulled
  • fresh blueberries
  • bananas, sliced into 1 inch thick pieces
  • kiwi fruit, peeled & quartered
  • wooden skewers

Instructions:

Place all the ingredients on a wooden skewer in the following order per kabob.  1 strawberry, 1 banana slice, 1 kiwi quarter, & lastly 4-5 blueberries. Serve immediately. 


MrsHappyHomemaker


Shared with these great blog parties!

August 14, 2012

{Not Your Typical} Walking Tacos


Once August & September hits - it begins camping season for us.  The temperatures are beginning to get much milder, and the weather is usually perfect.  Sometimes we head out to an actual destination, while other times - we just pop up a tent in the backyard.  Backyard campouts are fun too!  

One of my favorite things about the camping is the food. S'mores, hot dogs, anything cooked in a cast iron skillet - I love it all.  Another one of my favorites are Walking Tacos. But I make mine a little different than the typical recipe.  I don't use taco seasoning, and instead I use fresh ingredients - and the flavor that you end up with because of it is unbeatable.  When Life Around Home asked me to send over a lightened up camping recipe, I just knew that my walking tacos were the ticket.  


They are super fun to make, and to eat.  The kids just go crazy over them! Oh heck, who am I kidding - I go crazy over these too!!

And, you certainly don't have to wait for a campout to enjoy these.  Make them up any time.  They'd even be a really fun lunch option for when you or your kids brown bag it.


{Not Your Typical} Walking Tacos
Scroll down for the printable recipe card, courtesy of Life Around Home
Ingredients:
  • 6-8 - 1oz snack packs of baked cheese flavored tortilla chips (like baked doritos)
  • 3/4 pound pound ground sirloin (ground turkey or chicken can also be used)
  • 1/2 cup diced red onion
  • 1 jalapeno, seeds removed & minced (optional)
  • 1 teaspoon garlic powder
  • 1 tablespoon chili powder
  • salt & pepper to taste
  • 3/4 cup black bean & corn salsa
  • optional toppings of your choice, such as shredded cheese, shredded lettuce, cilantro, chopped tomatoes, etc

Instructions:

For the prep before camping trip:

In a skillet, start browning the ground meat.  Stir in the onions, jalapeno (if using), garlic powder, chili powder, salt & pepper. Cook until the meat is cooked through and the onions are translucent.  Drain any grease that has come off the meat.  Stir in the black bean & corn salsa.  Allow to cool, and then transfer to a plastic container or wrap the mixture in a large piece of heavy duty aluminum foil.  Chill in a cooler until ready to eat at the camp site.

For the camp site:

Warm the meat mixture in a cast iron skillet, or if using a tinfoil packet - warm over the campfire.  (The mixture can also be served cold, but is better warmed) Evenly distribute the mixture in between the snack size tortilla chip packs, crimp the edges, and give each pack a good shake.  Top with any toppings you desire & eat straight from the bag.  


***Remember, you can make these ANY TIME - not just for camping!!***


MrsHappyHomemaker


Shared with these great blog parties!

August 3, 2012

Watermelon Feta Salad Tarts


In honor of Watermelon Day, I thought it would be a fun idea to create a fun spin on the traditional watermelon feta salad by combining it with the appearance of a watermelon tart. The presentation is adorable, and gives a whole new life to such a simple recipe.  


The sunflower kernels is something you don't really see in watermelon & feta salad, but it adds just the perfect amount of salt & crunch, and compliments it so well. You can eat it as a snack or as a light meal.  You can even cut the watermelon into smaller circles for a fun party appetizer that is sure to be the talk of the party.


Watermelon & Feta Salad Tarts
created by Mrs Happy Homemaker for Life Around Home

(per serving)

Ingredients:
  • 1 3"-4" round slice of watermelon (use a glass or biscuit cutter)
  • 1/4 cup feta cheese
  • 1/4 cup thinly sliced red onion
  • 1/4 cup roasted & salted sunflower kernels
  • 1 tablespoon balsamic vinaigrette, or to taste

Instructions:

Lay your circular slice of watermelon on a plate.  Sprinkle with feta cheese.  Arrange the onion slices on top, and around the slice of melon.  Add the sunflower kernels on top of the feta.  Garnish with the balsamic vinaigrette.  Serve immediately.


MrsHappyHomemaker


Shared with these great blog parties!

July 17, 2012

Pico de Gallo Salsa


It's summer time, and that means that there is a ton of beautiful fresh produce in season.  I have so many recipes that I pull out this time of year, but I think my very favorite is homemade pico de gallo.  I grow tomatoes, jalapenos, & cilantro every year - so it just seems like the perfect thing to make to use it up too.  And, we sure do eat it up.

Pico de Gallo is not hard to make at all, and it really 'makes' a variety of Mexican dishes.  Like my steak tacos.  And, my pork tacos.  Plus - there's always just scooping it up with a tortilla chip for an awesome snack.

It's quite simple actually too.  Start off with your tomatoes - dice them up into petite bits and let them sit in a strainer basket (or colander) over a large bowl. This allows some of the excess juices off the tomatoes.  


Oh, and don't make the mistake of throwing away the tomato juice that drains off.  That's good stuff there - and I'm all about not wasting anything.  It's great to use in a marinade, in a juice or smoothie, or even as extra moisture in a recipe.  I actually use it in my pork tacos (recipe coming tomorrow) to help keep the pork moist while simmering.


While you have your tomatoes draining, dice up your onion, jalapeno, & cilantro.  


That's leftover chopped pork in the picture for pork tacos.  But don't put pork into your Pico de Gallo.  Please.


Once the tomatoes are done being 'juiced', mix it all up in a large bowl.  Then, squeeze the juice of one lime on top and give it another stir.  And, I have to add in that if you don't have one of these nifty lemon/lime juicers, you're missing out.  I am in love with mine, and it gets way more juice out than my hands - and it's just a fraction of the price of a traditional juicer.


Let it sit in the fridge, covered, for a good 30 minutes before serving for the flavors to marry a little.  

Fantastic stuff there, I tell ya.  And pretty too.


Store it in the fridge in an airtight container - and if you see you haven't used it all in about 48 hours (as if that's even possible) - just throw it into your food processor or blender, and make it into a restaurant style salsa, and can it. When my garden is really overflowing, I do this first thing and make several batches to can to enjoy in the winter.  Yummers.


Pico de Gallo Salsa
(printable button at bottom of post)

Ingredients:
  • 4 medium to large vine ripe tomatoes, diced
  • 1 medium red onion, diced
  • 2-4 jalapenos, minced (use accordingly to how hot you want it)
  • 1 bunch cilantro, chopped (about 1.5 cups, or suit to your taste)
  • 1 lime, juiced

Instructions:

Place the diced tomatoes into a strainer, or colander, over a large bowl.  Let 'drain' for about 30 minutes.  Reserve the juice for another use, if desired.  In a large bowl, combine the tomatoes, onion, jalapenos, & cilantro.  Squeeze the juice of 1 lime on top, and stir.  Cover, and let sit in the fridge for 30 minutes for flavors to marry.

Store in an airtight container in the fridge for 48-72 hours.  You can also put all the ingredients into a food processor or blender for more of a 'restaurant style' salsa, and it's great for canning purposes this way too.


MrsHappyHomemaker


Shared with these great blog parties!

July 10, 2012

Zucchini Tots


Tater tots are on most kids favorite foods list, but honestly - they just aren't the healthiest option.  This recipes takes the flavors of the classic tater tots & infuses that flavor into a much healthier alternative - shredded zucchini. Zucchini is a mild vegetable, and takes on the flavors of whatever you pair with it, making it the perfect substitution when making a healthier tot for your tot.


Adults will love these too, especially when paired with my chipotle ranch sauce.  I created a lightened up version of my delectable sauce though for pairing with this recipe.  So, you can choose to serve it with the original chipotle ranch sauce, the new lightened up version, or heck - don't use it at all and just pull out the ketchup, or whatever else you like to dip your tots in!


Taking care to press the zucchini mixture down in your mini muffin tins makes them nice & crispy - because no one likes a soggy tot.  Unless you're weird, which is still ok - because I never make any claims to be normal myself - or sane. -wink-


Feel free to experiment with this recipe a little too.  Like the spice?  Add some cayenne.  Love garlic?  Add more!  Don't like cheddar? Use another cheese! Customize it for your tastes, you won't hurt my feelings any.  

I have made these for many years now, and not trying to toot my own horn or anything - but they're awesome.  I actually would much rather have a helping of these than tater tots.  

You won't even know these are made with zucchini, so serve them up to your kiddos and sneak those veggies into them.  Don't worry, your secret is safe with me.  


Recipe card created by Life Around Home. Recipe by Mrs Happy Homemaker.


Zucchini Tots
(makes 2 dozen tots)
created by Mrs Happy Homemaker & shared with Life Around Home

Ingredients:
  • 1 cup shredded, peeled zucchini (about 2 zucchinis)
  • 1 small onion, diced
  • 1 egg
  • 1/4 Italian seasoned bread crumbs
  • 1 teaspoon garlic powder
  • 1 teaspoon seasoned salt
  • 1/2 teaspoon black pepper
  • 1/2 cup shredded cheddar cheese
  • paprika to garnish

Instructions:

Preheat your oven to 425 degrees.  In a large bowl, combine the first 8 ingredients.  Spray 24 mini muffin cups with non-stick cooking spray.  Using a small spoon, evenly distribute the zucchini mixture among the cups - filling about halfway & pressing the mixture down a little with the back of the spoon.  Sprinkle with paprika.  Bake for 20 minutes.  Serve with chipolte ranch sauce, if desired (recipe to follow).

For the lightened up chipotle ranch sauce, combine 1/2 cup fat free ranch dressing, 1/3 cup olive oil mayonnaise, & 1-2 chipolte peppers in adobo sauce in a food processor & puree until smooth.  

**The original version of my chipolte ranch sauce is found here.


MrsHappyHomemaker


Shared with these great blog parties!

June 12, 2012

Reese's Krispies


Reese's cups are seriously the best candy ever made, and if you want to dispute that - then my husband will stand up in a heartbeat to defend it's crown. 

Obviously, Reese's cups are perfect on their own - but add them to something & you can create a whole new experience of peanut butter goodness.  Like these little candy gems, reminiscent of a a classic rice krispie treat.  Oh my word, just when I thought a Reese's cup couldn't get any better, this seductive treat comes into my life & opens up a whole new world of possibilities.  


These treats are incredibly easy & fast to prepare - fun too!  Get the kids in the kitchen & let them help with these.  They will have a blast making (and sampling!) these.


Reese's Krispies
makes about 2 dozen

Ingredients:
  • 1 cup sugar
  • 1 cup light corn syrup
  • 1 1/2 cups creamy peanut butter
  • 4 1/2 cups Rice Krispies
  • 1/4 teaspoon salt
  • 6 Reese's cups, chopped
  • 1 cup milk chocolate chips

Instructions:

In a medium sauce pan over medium heat, melt the sugar, corn syrup, & peanut butter until evenly combined & has a smooth texture.  Pour the rice krispies cereal into a large bowl.  Remove the peanut butter mixture from the heat & immediately pour on top of the cereal; toss to combine.  Stir in the chocolate chips..  Let sit for 3 minutes, & then toss in the chopped Reese's cups.  Drop by tablespoon fulls on a parchment paper lined cookie sheet, or a silicone baking board.  Let cool to set up.


MrsHappyHomemaker


Shared with these great blog parties!

April 25, 2012

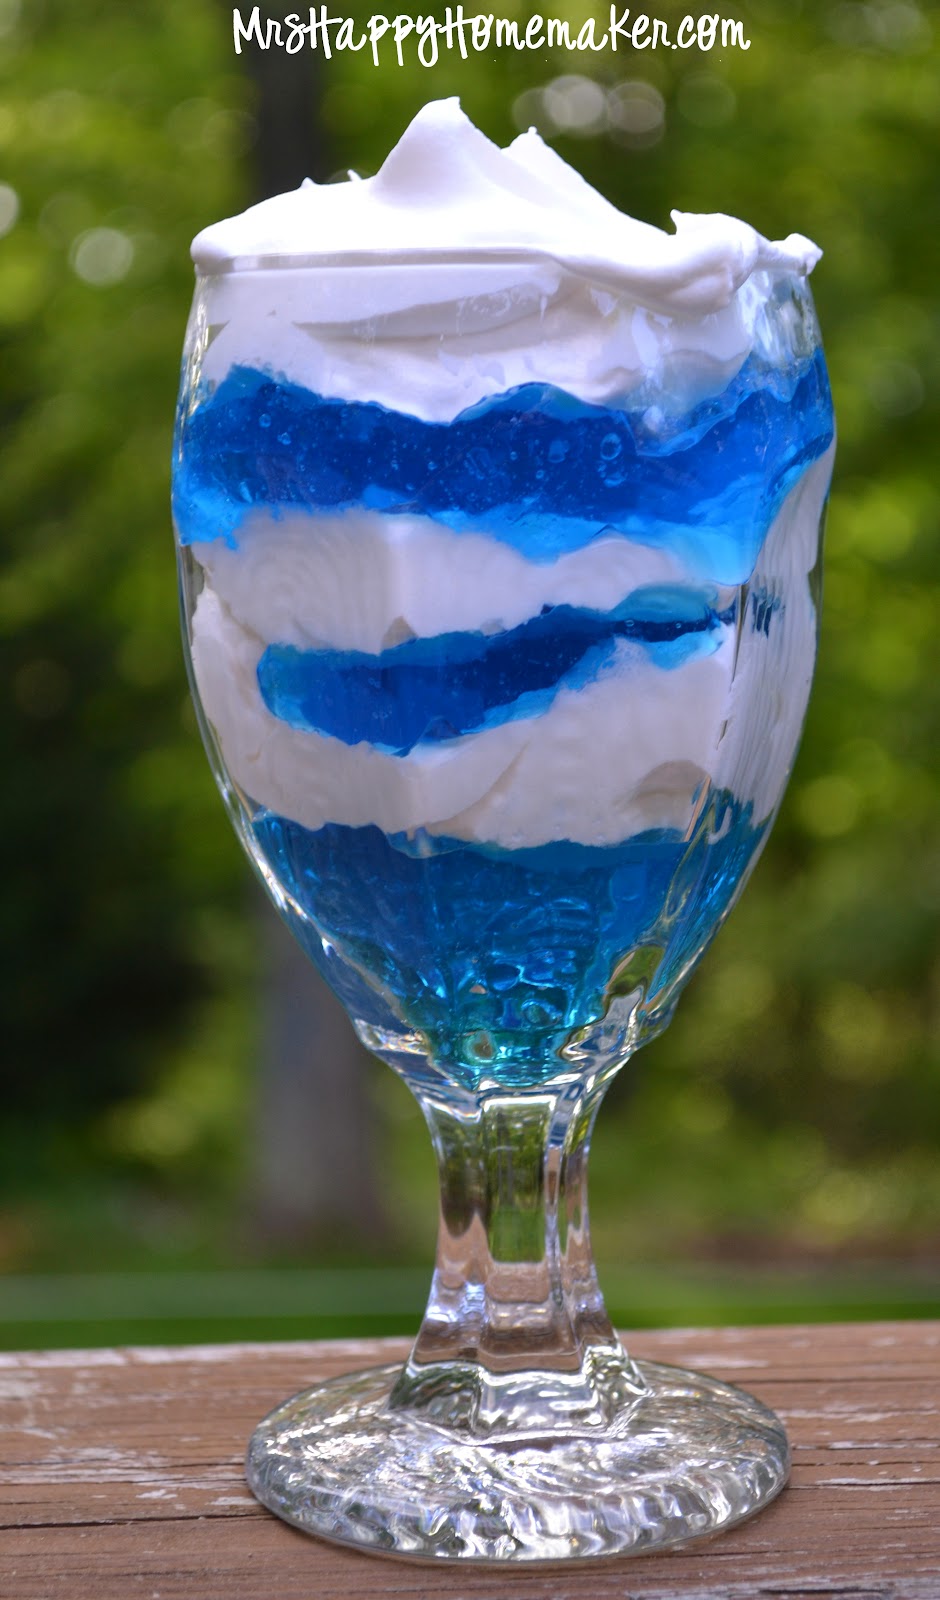
Cloud Parfaits


My kids love things like desserts, snacks, and special food treats - and I don't always have the time to whip up something.  So, having an arsenal of easy, fast 'special treats' is a great way to combat the whole zero time issue.


These cloud parfaits are one of my favorites to make.  My kids act like I've just spent 10 hours in the kitchen making up a special masterpiece.  In reality, that is no where near the case.  All they are is prepared blue jello & cool whip. Seriously, how much easier can you get?

They are also one of my favorite picnic treats.  The jello & cool whip packs up easily, and they are quickly put together when we reach our destination.  


Cloud Parfaits

Ingredients:
  • prepared blue jello
  • cool whip

Instructions:

Layer the prepared blue jello & the cool whip in a clear glass.  Serve.

MrsHappyHomemaker


Shared with these great blog parties!

February 2, 2012

Herbed Cheese and Cracker Bits


Are you ready for a really simple snack recipe?  'Cus I've got one for you. Mama used to make these when I was a teen and boy, are they good.  I can't be help accountable for eating the entire batch.


Herbed Cheese and Cracker Bits
Adapted from Paula Deen

Ingredients:

  • 2 (10.5 oz) boxes Ritz Cheese Bitz (try the jalapeno if you like a little kick)
  • 1/2 cup vegetable oil
  • 1 (1oz) package Hidden Valley original ranch
  • 1 heaping tablespoon dried dill
  • 1 teaspoon garlic powder
  • 1 teaspoon celery salt

Instructions:

Place the crackers in a large sealable bowl, or Ziploc bag. In a separate bowl, mix together the oil, ranch, dill, garlic powder, and celery salt. Pour this mixture over the crackers, seal, and invert to coat the crackers with seasoning. Refrigerate for at least 24 hours, turning the container every so often to keep the crackers coated. Let the mixture come to room temperature before serving. Store the covered container in the refrigerator.


MrsHappyHomemaker

January 23, 2012

Shrimp & Spinach Mini Pizzas


I have another recipe available over on Life Around Home - this time for Shrimp & Spinach Mini Pizzas.  These are SO good, and my husband is already bugging me to make some more.  Even more - they are good for you! Make them for dinner, or make them for a snack.  Just make them!

Check out the printable recipe card here.


MrsHappyHomemaker

.

--> Related Posts Plugin for WordPress, Blogger...