July 21, 2011

Regina's Grandmother's Fruit Salad


My dear friend, Regina, shared with me her grandmother's recipe for fruit salad not long ago - and let me tell you that it is absolutely outstanding!  You may have seen it on my Menu Plan for the week, and you will be seeing it on many more menu plans in the future.  My children each had 2 bowls, and I had 3!  I would have had more than that, but I have been working on the whole restraint thing. ;)


Enjoy!!


Regina's Grandmother's Fruit Salad


Ingredients:

  • 6 navel oranges, peeled & sliced thin
  • 1 & 1/4 pounds red seedless grapes, halved
  • 1 20oz can of chunk pineapple, drained
  • 1 16oz bag of frozen whole strawberries - almost thawed
  • 3 or 4 bananas., sliced
  • Sugar


Instructions:


Layer the oranges in a flat container, giving each layer a nice heavy coating of sugar

Layer the halved grapes in a separate container, sugaring each layer heavily

Let them sit out at room temperature for several hours to get those juices flowing.  Stir occasionally.  Regina says,"I usually prepare mine the night before, and after they've set out awhile, I put them in the refrigerator overnight until I am ready for them".

Combine the oranges & grapes - then mix in the drained pineapple chunks. Cover & put the mixture into the refrigerator for an hour for the flavors to meld.

Add the strawberries & sliced bananas shortly before serving.  

MrsHappyHomemaker

July 18, 2011

Menu Plan Monday 7/18/11-7/24/11


Here is my menu plan for the week!

Monday, July 18
Breakfast: Cereal
Dinner: Chicken Enchiladas

Tuesday, July 19
Breakfast: Pancake Sausage Muffins
Dinner: Bang Bang Shrimp, Black Beans & Corn, Cucumber Salad

Wednesday, July 20
Breakfast: Crockpot Oatmeal with Steel Cut Oats
Lunch: Mac n' Cheese
Dinner: Saucy Garlic Chicken, Ranch Mashed Potatoes, Green Beans, Rolls

Thursday, July 21
Breakfast: Breakfast Cookies
Lunch: Regina's Grandma's Fruit Salad
Dinner: Bacon Cheese Stuffed Shells, Confetti Braid Bread

Friday, July 22
Lunch: Sandwiches
Dinner:  Burrito Pie

Saturday, July 23:
Breakfast: Eggs, Country Ham, Grits, & Biscuits
Lunch: Nachos (with homemade cheese sauce & fresh salsa)

Sunday, July 24:
Brunch: Waffles & Sausage
Dinner: Sausage Grinders w/ Caramelized Onions, Sweet Potato Fries

Of course, these dates aren't set in stone - so I may end up switching some to different days in this week depending on my mood & time constraints!  :)


MrsHappyHomemaker

July 16, 2011

Easy Menu Planning Magnetic Organizer


I have been searching for a Menu Planning Magnetic Organizer design for some time.  But all I have ever been able to find are ones that are SO time consuming!  Don't get me wrong, they were cute - but not practical for me to pull off without giving up from frustration & exhaustion.  


July 15, 2011

Homemade Carpet Powder


I have 8 inside furbabies.  Yes, you read that right.  Eight!  4 cats & 4 dogs.  Needless to say, when it comes to products that make my house smell nice - I am a fan.  


Carpet powder is one product that I can't do without.  Even though it is a reasonable price, I buy so much of it that it works out to be pretty expensive.  Plus, it doesn't always work as well as I like.  


Homemade carpet powder to the rescue!!  It's cheap & it has not met an odor that it doesn't take care of.  


All you need is baking soda & orange essential oil.  You can use other essential oils if you like, but I like the orange.  Not only does it refresh better, but I always have it on hand for making our favorite Creamsicle Pops.


It is also nice to have an empty Parmesan cheese container, or some other shaker.


Mix the baking soda & several drops of the orange essential oil together in a bowl using a whisk.  Then, spoon the mixture into your shaker.  


Sprinkle onto your carpets - let it sit for about 15 minutes, then vacuum up.  


Simple, thrifty, & works like a charm.


MrsHappyHomemaker

July 14, 2011

No-Bake Polka Dot Cheesecake


Just in case you didn't know....  It is HOT outside!  


Like really HOT.  Ugh.  My poor husband works all day out in this hot mess, and I just don't see how he does it.  Maybe I'm a wimp because I can't walk from my back door to my outside trash can without breaking a sweat & my trash can is only a few feet away!  


With this utter hotness, heating up my kitchen is not exactly one of my favorite things to do.  But, my husband & kids keep asking 'When are you going to make something sweet??'.  


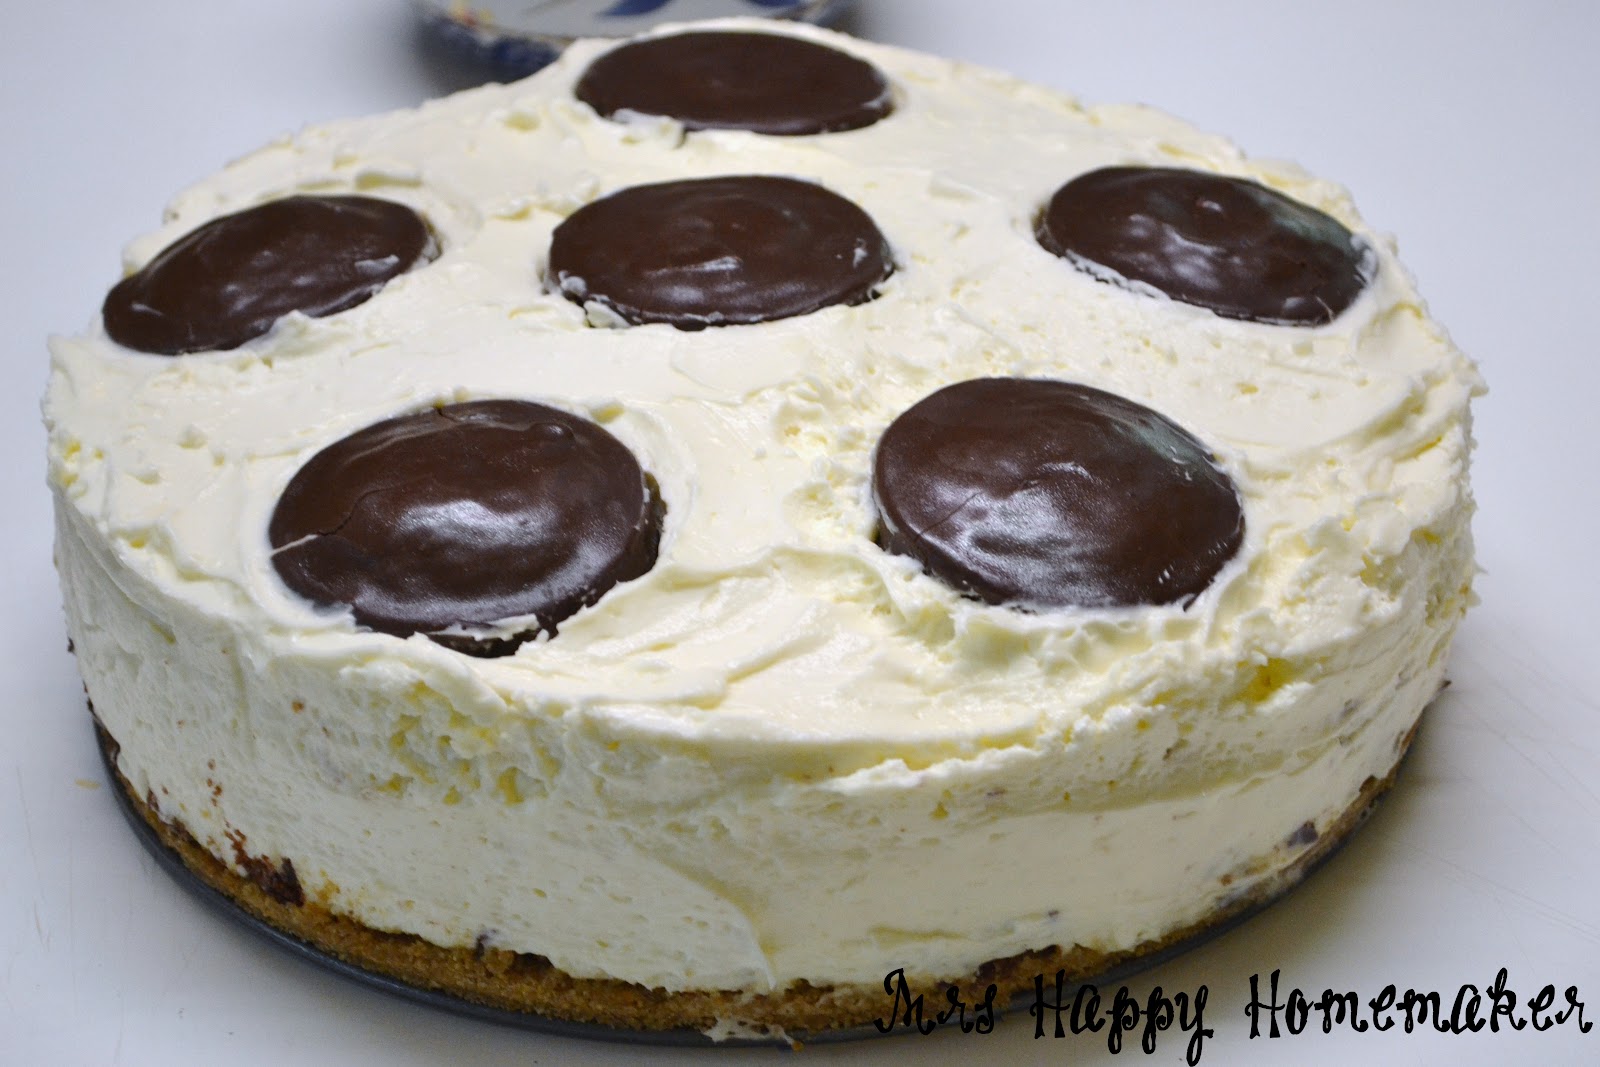
That's where this No-Bake Polka Dot Cheesecake comes in.  I came up with this one a while back, around the same time when I was experimenting with my Twinkie Tiramisu.  My Polka Dot Cheesecake has snack cakes in it too! Super easy, super fast, & you stay cool making it!


In a food processor or blender, crush up the graham crackers,  Add in the brown sugar & butter.  Blend until well combined.  Press the mixture into the bottom of a 10" springform pan.  (If you don't have one this size, you can use a 9x13 pan & make bars instead)

Chop or crumble up 4 of the snack cakes & spread it over the graham cracker layer.  


With an electric mixer, beat together the cream cheese, heavy whipping cream, confectioners sugar, & vanilla extract.  Make sure you put it on the lowest speed possible, or hand whisk first to avoid spillage.  Once it is more incorporated, beat with the mixer until thick.  It will take 3-6 minutes depending on your mixer.

Spoon the cheesecake mixture into your pan.  Now, time for the polka dots!


With the palm of your hand, gently wiggle the remaining 6 snack cakes into the areas of your choice in your cake.  Using a spreading knife or spatula, fill in any gaps around the snack cake with the cheesecake filling.


Refrigerate at least 6 hours before serving. If using a springform, make sure you take off the outer layer of the springform very carefully & gently after refrigerating.


No-Bake Polka Dot Cheesecake


Ingredients:
  • 1 pack of graham crackers (9 twin crackers)
  • 3/4 cup packed brown sugar
  • 5 tablespoons butter, melted
  • 4 (8oz) packages of cream cheese, softened
  • 4 cups heavy whipping cream
  • 2 cups confectioners sugar
  • 2 tablespoons vanilla extract
  • 10 round chocolate snack cakes with cream filling (such as Ring Dings)


Instructions:


In a food processor or blender, crush up the graham crackers,  Add in the brown sugar & butter.  Blend until well combined.  Press the mixture into the bottom of a 10" springform pan.  (If you don't have one this size, you can use a 9x13 pan & make bars instead)

Chop or crumble up 4 of the snack cakes & spread it over the graham cracker layer.


With an electric mixer, beat together the cream cheese, heavy whipping cream, confectioners sugar, & vanilla extract.  Make sure you put it on the lowest speed possible, or hand whisk first to avoid spillage.  Once it is more incorporated, beat with the mixer until thick.  It will take 3-6 minutes depending on your mixer. Spoon the cheesecake mixture into your pan.  


With the palm of your hand, gently wiggle the remaining 6 snack cakes into the areas of your choice in your cake.  Using a spreading knife or spatula, fill in any gaps around the snack cake with the cheesecake filling.

Refrigerate at least 6 hours before serving. If using a springform, make sure you take off the outer layer of the springform very carefully & gently after refrigerating.


MrsHappyHomemaker


July 13, 2011

Jell-O Cookies & Cream Pudding Mix - $.49/box on Amazon


Amazon is at it again with another great grocery deal!


Currently, they have a Manager's Special running on the Jell-O Cookies & Cream Pudding Mix at just $.49 a box.  The cheapest I have ever seen these for is $.88 cents at WalMart & higher than that at the grocery store.


Select the 'Subscribe & Save' option, & check out.  You will receive free shipping too.  When you have received your shipping notification, go into your account & cancel the subscription.  


MrsHappyHomemaker

July 7, 2011

Homemade Bagel Bites (Freezer Cooking)


My big freezer cooking day will be coming up in the next week, and one item that is always on the list to make are Homemade Bagel Bites.  These are WAY WAY better than the ones you buy in the grocery store!  


They are super easy to prepare, & freeze beautifully.  I like to make several batches to go into my freezer for easy go-to lunches when I don't have much time.  


Who am I kidding?  I never have much time.

Of course, you can always make these to serve immediately too. 


They will be crispy & addictive!


Homemade Bagel Bites


Ingredients:

  • 1 bag of miniature bagels
  • 8-12 oz of mozzarella cheese
  • 8 oz of pepperoni, chopped (or ham if you prefer!)
  • 1 cup of pizza sauce


Instructions:


Lay all the bagel halves out.  Combine the shredded cheese, chopped pepperoni, & pizza sauce.  Spoon a couple tablespoons onto each bagel half.  

If you are cooking them now, put them into the oven at 350 degrees for 8-10 minutes.  

If you are freezing them like I do, place them on a baking sheet & freeze until firm.  Then pop them into freezer bags.  I like to wrap them with aluminum foil before putting them in the freezer bags - just to be double sure no nasty freezer burn hits them.  From frozen, cook at 375 for 20 minutes. 

.

--> Related Posts Plugin for WordPress, Blogger...