September 16, 2012

The Bulletin Board


I could really use everyone's help!! Please click below & VOTE for my weeknight meal recipe, Baked Ham & Cheese Sliders! And please SHARE!! I could use all the votes I can get! 

http://www.mrfood.com/voting/Weeknight-Meal/blogger/Faulkner


Welcome to this week's Bulletin Board!!

This week, I'm sharing my Cheddar Bacon Pork Chops.  


Here are my favorites from last week.

No Bake Chocolate Peanut Butter Balls from A Little Nosh


Chalkboard Command Center from Just Us Four


15 Real Food Homemade Dressings from SuzyHomemaker


Thanks to everyone who shared last week!  I can't wait to see what all you pin to the board this week!!


Never miss a thing, follow me on Facebook!

MrsHappyHomemaker


Shared with these great blog parties!

September 15, 2012

Bacon Cheddar Pork Chops


Many of you have noticed Bacon Cheddar Pork Chops on my weekly menu plans, and I have gotten several requests for the recipe.  So, I figured it was about time to share it.

I came up with these a while back when I needed to make something for dinner, but was running low on groceries.  I hadn't yet made a trip to the store because of an illness I suffer from called 'Grocery Store Crowd Avoidance Syndrome' - also known as GSCAS.  If you are also a sufferer of GSCAS, I completely understand your condition - and you can rest easy knowing that you can find support here.  

Anyhows - back to these pork chops.  Looking through what groceries I did have, I pulled out a few things & set to work to see what I could come up with. What I came up with was marvelous, and became a main dish staple in my home.  Everyone raved over it the night that I created it, and my 2 year old devoured a whole pork chop himself.  And even though I have made it countless times, the raving never stops - and it still gets devoured by every member of my family.

Ready for the recipe?  Of course you are.  Why else would you be here?  Oh wait, that's right.  For the GSCAS support group.  We meet down the hall, second door on the right.

Here's what you need:


Set out two pie dishes, or similar kind of dish.  In one dish, whisk together 2 eggs and a couple splashes of milk - and in the other, mix together your bread crumbs, shredded cheese, & bacon bits.

Now, I've tried freshly fried bacon with this too...but it just doesn't taste as good.  Go figure.


Dip the pork chops into the egg mixture & then dredge into the breadcrumb mixture.  Shake any excess off, and then repeat - making sure to press the breadcrumb mixture into the pork chops on both sides the second time around.

Lay in a baking dish sprayed with cooking spray.  If you have a cast iron, use it as it helps form a beautiful crust.  However, if you don't have one - don't worry about it.

Sprinkle any remaining breadcrumb mixture on top of the pork chops, and press down lightly.


Bake in a preheated oven (set to 400 degrees) for 30 minutes - carefully flipping the chops halfway through.

Sprinkle with a little bit more cheese & pop them back in the oven for a couple of minutes, just enough to melt the cheese. Remove from the oven, and garnish with chopped green onions if desired.


Serve 'em up to your family and watch how fast they get gone.  


Bacon Cheddar Pork Chops

Ingredients:
  • 4 boneless, medium thickness pork chops
  • 2 eggs
  • 1/4 cup of milk
  • 1.5oz real bacon bits (half of a 3oz package)
  • 1 cup bread crumbs
  • 1.5 cups shredded cheddar or cheddar blend cheese
  • chopped green onions to garnish

Instructions:

Preheat your oven to 400 degrees.

Set out 2 pie dishes, or similar dish.  In one, whisk together the eggs & milk. In the other, mix together the bacon bits, bread crumbs, & 1 cup of the shredded cheese.  

Dip the pork chops in the egg/milk mixture & then into the breadcrumb mixture. Shake off any excess crumbs & then dip back into the egg/milk mixture again. Dredge in the breadcrumb combination & press the mixture into each side.

Spray a baking dish with non-stick cooking spray, and place the pork chops in.  Cast iron works best as it helps crisp the crust better, but it's not a necessity if you don't have one.  Sprinkle on any remaining breadcrumb mixture, and press down lightly.

Bake for 30 minutes, carefully flipping over halfway through cooking.  Sprinkle with the remaining 1/2 cup of cheese & return to the oven for 2 minute, just enough to melt the cheese.

Garnish with chopped green onions.


Never miss a thing, follow me on Facebook!


MrsHappyHomemaker


Shared with these great blog parties!

September 14, 2012

Homemade Liquid Laundry Detergent (Plus a FREE printable label!)


Buying laundry detergent can put a big dent in any budget, and making my own is one way where I save the bucks.

If you bought 5 gallons worth in the store, you'd be paying around $100!! Maybe even more than that depending on the brand.  But, when you make your own - you can make 5 gallons for less than $2!!  

When I buy all the ingredients for the first load - it comes out to $6.95 - but there is still lots of borax & washing soda left, so all that I need to buy for the next few batches is the Fels Naptha soap (which is really cheap!).


That makes 20 gallons for under $10!


Making your own detergent accounts for some enormous savings!

I buy my ingredients at WalMart, which I've found to be the cheapest place to buy them at.  Let me break down my costs for you.

  • Borax - $2.99
  • Washing Soda - $2.99
  • Fels Naptha Soap - $0.97

You can also purchase the ingredients on Amazon, but I've found that they are more expensive this way for the borax & washing soda.  However, the Fels Naptha price isn't bad on there.

You can also use essential oil for scent, but that's completely optional.  The essential oil adds nothing to the cleaning power, but does give it a nice smell if you'd like to have it.  If you do want the added scent, I really like using orange essential oil because of the clean smell that it has.  Plus, it's also the one that I recommend for using in my homemade carpet powder. If you purchase it on Amazon (which has a great price on it), it runs about $5.00 for 4 ounces.  You only need 1/2oz to 1oz for a 5 gallon batch (depending on how much scent you want) so it lasts for a good while, and doesn't add much to the final cost.  Still way cheaper than store bought.

If you're a Tide detergent lover - check out the tip at the bottom of the post!

So, are you ready to make your own laundry detergent & rack up the savings? I'll walk you through how I make mine.

Here's what you need:


  • Borax
  • Arm & Hammer Super Washing Soda (NOT baking soda)
  • 5.5oz Fels-Naptha Soap (you can also use Zote or castile soap - about the same amount, you don't have to be exactly precise)
  • water
  • 5 gallon bucket


First, you grate up your Fels-Naptha soap.  Or you can substitute Zote (which will make your laundry detergent pink for all your girly-girls) or pure pure castile soap.


Add the soap shreds to a pot with 4 cups of hot water.  Put the heat on medium-high, and stir until completely melted - about 10 minutes.


Fill up a 5 gallon bucket halfway with hot water.  Pour in the melted soap mixture.  


Then, stir in 1 cup of borax & 1 cup of washing soda.


If you're using the essential oil, now is the time to add it.  You add in 1/2oz to 1oz, depending on how scented you want it.  Although, I never really measure it anymore - I just shake in enough drops to where I feel satisfied, and stir.


Now, fill up the bucket with warm water all the way to the top - and stir again.  If you don't have a utensil long enough to reach the bottom, just put on a pair of rubber dish gloves beforehand.


Snap on a lid, and let it sit for 24 hours to gel up.  Note: it will be more of a gloppy gel than purely gel, and this is completely normal - and what it should look like.

At this point, you can divide it up between different containers (empty laundry detergent containers, milk jugs, etc).  I prefer to save 1 laundry detergent container, & refill it as needed to save on space.

A lot of people like to dilute it even more at this step (therefor turning the 5 gallons into 10 gallons) - filling their container halfway with the gel & then the other half with water.  You can choose to do this if you like.  However, my family seems to produce pretty dirty clothes, and I prefer to not dilute mine further.  I feel like the cleaning power is stronger this way. 


For HE front loading washers, use 1/2 cup for a large load.  For regular top-loading washers, use 1 cup for a large load.  You can use stain removers or oxi-clean with this too if you would like - just the same as you would use them with the detergent you buy in the store.

I love this detergent, and have compared it to store-bought & I can't tell a difference.

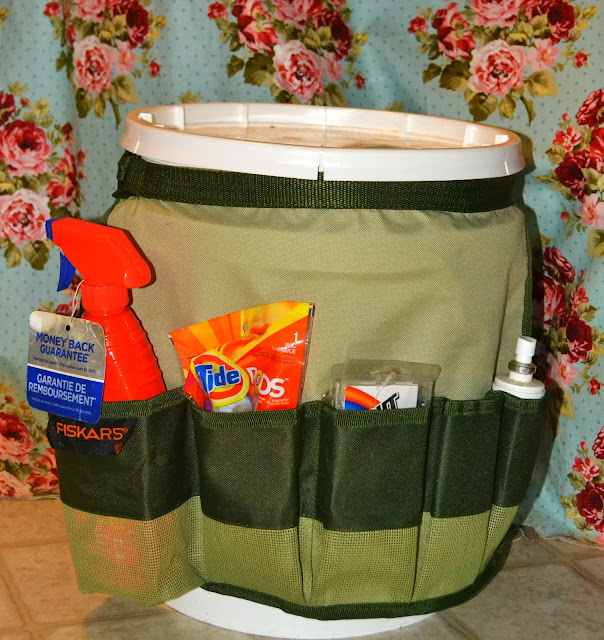
I have attached this neat bucket organizer that my mother gave me around mine.  I use it to organize laundry detergent samples, stain remover, etc.  


You can leave your homemade detergent in the bucket, or you can split up the large batch between empty detergent containers, milk jugs, etc.  

I created this pretty printable label for your homemade detergent containers too.  Just right click to save to your computer to print, or use the printer friendly button at the end of this post.  Enjoy!!


**Per a readers tip, if you are a TIDE lover - use a little liquid TIDE in your homemade detergent for extra stain-fighting power!


Never miss a thing, follow me on Facebook!


MrsHappyHomemaker


Shared with these great blog parties!

September 13, 2012

Bean & Corn Salsa


Tired of the same ol' salsas & dips?  Well, kick it up a little with this bean & corn salsa of mine.  It's so easy to make in addition to being colorful & delicious!


Pair it up with a favorite grilled meat or Mexican inspired dish - or just serve it alongside tortilla chips.  Use your imagination, and try it with a variety of dishes to add a whole new flavor element to it.  Take my Pork Carnitas for instance, I never serve them without this bean salsa!


Bean & Corn Salsa
(scroll to bottom for printable recipe card courtesy of Life Around Home)

Ingredients:
  • 1 (15.5oz) can black beans, rinsed & drained
  • 1 (15.5oz) can black eye peas, rinsed & drained (can sub 2 cans of black beans & omit the black eyes)
  • 1 (14.5oz) can diced tomatoes with green chiles, drained
  • 2 cups frozen corn kernels, thawed
  • 1 medium red onion, minced
  • 4 jalapeno peppers, seeded & chopped small (leave in the seeds if you like it spicy)
  • 1 cup Italian salad dressing
  • 1 bunch of cilantro, chopped

Instructions:

In a large bowl, combine all the ingredients.  Cover & refrigerate at least 30 minutes before serving.


Never miss a thing, follow me on Facebook!


MrsHappyHomemaker


Shared with these great blog parties!

September 12, 2012

Menu Plan Wednesday


It's Wednesday - which means it's time for my weekly menu plan.  You can read about why I menu plan on Wednesdays here.  

Here's what our menu is looking like for this week.


Beef Tips & Rice
Buttermilk Biscuits


Fried Flounder
Pan Seared Asparagus
Jalapeno Cornbread


Cheddar Bacon Pork Chops (recipe coming soon)
Green Beans
Squash Casserole
Cheddar Garlic Buttermilk Biscuits


Hearty Beef Puff Pie


Garlic Baked Chicken
Cheddar Bacon Stuffed Mushrooms
Corn Casserole


Caramelized Onion & Prosciutto Pizza
Salad


Do you menu plan too?  Link up your weekly menus below!


Never miss a thing, follow me on Facebook!


MrsHappyHomemaker


Shared with these great blog parties!

.

--> Related Posts Plugin for WordPress, Blogger...