Showing posts with label Crafts. Show all posts

July 6, 2012

Pourable Snack Containers from Creamer Bottles


{photo credit}


I usually make my own coffee creamer, but sometimes I do buy the store bought stuff when I have coupons that make it free (I love super double coupon events!).  I think my favorite thing about the store-bought creamer is recycling them into really clever snack containers.  

You can put a variety of snacks inside, and it makes me feel like I'm being all green and stuff.  

We recently brought one to a picnic at the park, filled with cashews & peanuts.  


So, next time you buy a bottle of store-bought creamer, don't send that container off to the landfill.  Wash it out, and turn it into a useful place to store snacks.

Do you re-use & re-purpose anything?



MrsHappyHomemaker


Shared with these great blog parties!

May 12, 2012

DIY Bubble Station


My kids LOVE bubbles, especially my 2 year old.  In fact, 'bubble' was one of his first words.  His favorite thing to do on a nice day is to play in his sandbox & blow bubbles.  


I saw an idea on Pinterest on making a bubble station, and immedietly I knew that was the perfect thing for our back deck, and our littlest kiddo.  It's super easy too.  You could easily whip one of these up in a matter of minutes.

You will need a large container of bubbles, a beverage dispenser, scrapbook letters, & a few plastic cups.  I used empty greek yogurt containers that I washed out for our bubble cups.  I feel all earthy when I do things like that.  I bought the plastic beverage dispenser at Walmart for about $3, and I already had the scrapbook letters on hand.  So, this project cost me next to nothing in both dollars and time.


Stick on the scrapbook letters - mine simply says 'Bubbles'.  Pour the bubbles in the beverage cannister, and dispense into plastic cups (or recycled yogurt containers) and have fun!


MrsHappyHomemaker


Shared with these great blog parties!

April 2, 2012

Edible Easter Baskets


While cruising Pinterest the other night, I came across a pin from this site on edible Easter baskets, made with candy packages.  I was instantly in love with the idea, & went to the store the very next day for the components.  

What I love about these is that there are so many variations of it.  You can choose just one kind of candy, and make the whole basket out of that.  OR - you can mix up the candy selections a little.


I chose the later option, obviously.  My kids like so many different kinds of candy that it just seemed like the best option.  Per basket, I used 2 boxes of Peeps (in 2 different colors), 1 pack Snickers Eggs, & 1 pack Hershey's Marshmallow Eggs.  The Hershey's were a little taller than the rest, but I like that because I am planning on putting a couple goodies - like small stuffed bunnies, stickers, & pencils in the back & I like that they have something to lean back against.  

This project is super easy.  

First, let's assemble the basket part.  Tape the candy, end to end, with clear packaging tape.  It holds very strong, & is nearly invisible.  Then, trace the bottom of the 'basket' on some cardboard.  Cut it out & adhere it to the bottom of the candy basket with clear packaging tape or spray adhesive.


Now, time to make the handle.  You can do this a number of ways, but I chose to use something I had on hand.  A paper bag.  


I spray painted a portion of the bag that I wanted to use.  I love this ocean blue color.  It's my favorite & I always have a can on hand!


Wait for it to dry, & then clip it out.  You want the longest portion you can get.

Take that strip, and cut it into 3 or 4 thinner strips.  Tape the ends together with a small piece of clear tape.


Braid the little strips.  Tape each end inside the candy basket using clear packaging tape.  Fill with Easter grass.


Remember, the handle is decorative.  Don't really try toting the basket that way!  The container of the basket is actually pretty sturdy.


MrsHappyHomemaker


Shared with these great blog parties!
Beauty & Bedlam
Today's Creative

January 24, 2012

Valentines Cards with 3D Appeal


I first saw the idea for these super cute Valentines cards on Pinterest, and I fell in love with them.  Every year, our homeschool group has an annual Valentines party - and I thought these would be so neat to hand out this year.  

Since we have a party for all the homeschool kids together, and not just individual grades - I thought it would be cute (and cheaper) to get both my daughters together with their fists outreached and right beside each other for a joint card.


Whether you have one kid in the photo or two - the process is the same. Have your child hold out their fist in an upward position.  Stand on a stool or chair and take a picture.  Once developed, cut a slit in the picture at the top of their fist and another at the bottom.  Stick a sucker right in the opening, and ta-da - you're done!  The slit with the sucker gives the hands a 3D effect.  Very cool!

I ordered my cards through SeeHere.com.  I added 24 of them to my cart, and then used the code 25FREE.  I paid about $3.00 for shipping.  I am not sure how long that code is good for though.  You can do cards, or just regular photographs.


MrsHappyHomemaker

Check out all the great blog parties that I link up with!

December 22, 2011

Peppermint Candy Trays - and fluted bowls too!


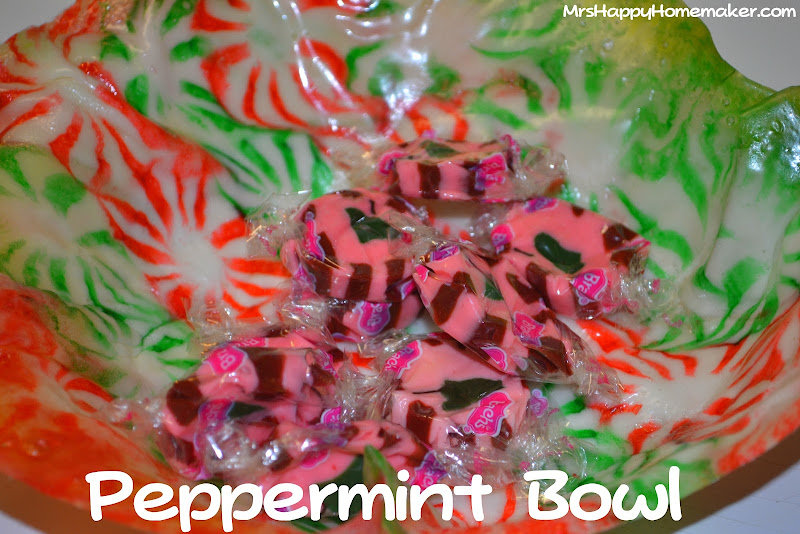
Ok, so I am pretty happy with the outcome of this project I did. I made a tray and a bowl out of peppermint candies!  It is SO easy!  I know I'm going to make more, it's addictive.  But, I just had to show you this neat little craft.


All you need is peppermint candies of your color choice, and parchment paper.  I used both green and red - you could also use the same color.

Just line up the candies in whatever pattern and shape of your choosing on a parchment paper lined baking sheet.  Separate them just a tad, as shown.  


Bake it in an oven preheated to 350 degrees for about 7-10 minutes.  Remove and set it on a wire baking rack to cool for a few minutes.


Make sure you watch that time!!  You do not want it to over cook it. Refer to the photo below & don't repeat my mistake!


After a few minutes, carefully remove the parchment paper.  Remember, these are fragile.  Don't get upset if all of it doesn't come off - you aren't going to be looking at the backside.  Let the tray cool at room temperature for a couple hours.  Do NOT place in the fridge to get it to cool faster - it will crack. I learned this the hard way.


When it has cooled for several hours, it is ready to use.  It should not be sticky - it should dry to be smooth & glossy.  Do not use it to serve hot substances on.  Stick with things like fudge, cookies, candy, and such.  There should not be any flavor of the candies on the food.

You can also try your hand at making a bowl.  I made a small fluted edge candy dish.  My ends were just starting to cook for too long, but since it had just started, it kind of gave the edges a stained glass look.  

Or so I tell myself. 

To make a bowl, after it has cooled for a few minutes - set the candy inside of a bowl with the parchment paper still attached.  Using a dishtowel, press down very gently to form the shape of a bowl.  If it hangs off the edge of the bowl a little, it will form a fluted edge.  Remember now - gentle!


This is a great little craft to make with the kiddos too.  If at first you don't succeed, try again - and remember, timing & gentleness is everything!  


MrsHappyHomemaker

Check out all the wonderful blog parties that I link up with!

.

--> Related Posts Plugin for WordPress, Blogger...