December 31, 2010

Honey Oatmeal Bread


Honey Oatmeal Bread after baking in the breadmaker

I love homemade bread.  It all started with my mother's buttermilk biscuits.  She doesn't know it, but all those chores she had to tell me 100 times to do as a child could have been taken care of immediately if she had just bribed me with biscuits.  Heck, I would have cleaned the entire driveway with a toothbrush for 2 batches that were just for me, but that's another story.

Of course, no bread recipe can hold a candle to Mama's biscuits, so I don't even try.  I can't even put butter on her biscuits - it's a travesty.  However, I do enjoy a good smear of butter on a loaf of freshly baked bread and this honey oatmeal bread is definitely among my favorites.  It has a slight hint of sweet, but not so much where it takes over the earthy flavor.  It is also a wonderful bread to make some great, hearty sandwiches with.  That's my husband's favorite thing to do with it.  I'm kind of partial to the butter though.  I mean, it's BUTTER.  Enough said?  I think so.


You can make this bread completely in the breadmaker, or remove it after the dough cycle, pour the dough into a loaf pan, & cover with a damp cloth & let rise for about 30 minutes before baking.  Set your oven on 350 & bake for about 30 minutes, or until the crust is browned.

I actually prefer mine to be baked in the oven b/c I like how thin the crust is when it is done that way.  But, I have nothing against doing it in the breadmaker, & often bake it that way too (I select the light crust setting).  Whichever is your preference, it comes out great either way.

Honey Oatmeal Bread baked in the oven

Oh, and this bread is even better with garlic butter smeared on top!


Honey Oatmeal Bread
Ingredients:

  • 1 warm cup water
  • 1 tablespoon vegetable oil
  • 1/3 cup honey
  • 1 teaspoon salt
  • 1/2 cup rolled oats (heaping)
  • 2 1/3 cups bread flour (or wheat flour)
  • 1 heaping teaspoon active dry yeast
Instructions:


Place ingredients in bread machine pan in the order suggested by the manufacturer.
Select Light Crust or Basic setting, and press Start.  


December 29, 2010

Taking Inventory - Pantry Challenge (Link-Up!)


Clean Out the Cupboards Challenge

I have been preparing for the upcoming Clean Out Your Cupboards Challenge by taking inventory of the food in the house.  I have finished with the pantry & freezer, and have the refrigerator left to do.  I will get on that task later tonight after the kiddos are in bed b/c I plan on performing the daunting task of cleaning the inside of the fridge while I am at it.  (Insert 'Jaws' theme song here)

Here is a peak at the inside of my pantry.  Well, technically it isn't really a pantry.  It is the closet underneath my stairs that I stuck a shelf in to make a pantry area..so don't laugh!  I took the best picture that I could of the 'pantry' but because of the location, it is a hard angle to get. 


I printed out the inventory sheets that I mentioned in my last post, & listed everything.  I put all the sheets in my household notebook (I will talk more about that in a later post).  


Pantry Inventory

Freezer Inventory

My goal for this pantry challenge is to reduce our January grocery bill as much as possible.  My husband's work is anything but busy right now, so this challenge could not come at a more perfect time for us.  We are looking to pinch pennies as much as possible to get us over this slow hump!  

Also, I have a small stockpile of some items that I got for free or cheap with coupons matched with sales, and I need to use those up before the expiration dates.  No matter how little you pay for something, it's still a waste of money if you fail to use it before it goes bad.  That's nearly the same as just throwing money in the trash can.


Next on my agenda is to sit down & plan some menus using as many items that I already have in the house as I can, & as few things that I have to go out and buy as possible.


I hope that you will join me & my fellow co-host bloggers as we embark on this challenge.  We would love you have you!

December 27, 2010

Clean Out the Cupboards

Clean Out the Cupboards Challenge


Welcome to the Clean Out the Cupboards Challenge, co-hosted by Laura at Frugal Follies, Denise at Shopper Strategy, Robbie at Going Green Mama, Crystal (Me!) at Mrs. Happy Homemaker, & Rebecca Jean at Midnight Maniac.

This January, the four of us plan to challenge ourselves to eat from our pantries - to use up all that excess food sitting in the backs of the cupboards, from the refrigerator door, and from the freezer - and limit our shopping to as little as possible. 

And we want you to join us, too!

The rules are very simple: Make up your own rules, based on what's best for your family.  But here are a few basic guidelines. 

  • Eat!  This is not a eat as little as possible challenge.  Prepare healthy foods for your family, even if it means doing more shopping than you expected.Don't load up this week with a month's worth of groceries.  Go ahead and do your regular shopping, though.
  • Don't not buy groceries, but then eat at restaurants all month long.  Of course, feel free to eat at restaurants as you would normally do, if you wish.
  • If you need to stop the challenge mid-month, based on the needs of your family, do so.
As for the details of the challenge, it's up to you!
  • You might want to purchase dairy and produce throughout the month; others might try to stretch what they already have.   
  • You might want to limit your challenge to food items, or extend it to personal care items, paper goods, and cleaning supplies. 
  • You might want to allow yourself to purchase great deals; others won't.  
      Next week, we'll kick off the challenge by posting our goals.  So figure out what your goals are.  Is it to save money?  To have more room in your pantry? To stop wasting food and therefor help the environment?  Figure out why you want to participate in the challenge & I look forward to hearing what your goals are!

      (Bloggers: if you wish to join us, we'll have a linky each week where you can link to your challenge posts.  The linky will appear at the blogs of all four co-hosts!)

      I will be using these great inventory sheets for the pantry, refrigerator, & freezer for keeping up with the contents of each & helping with the menu planning process.  You can find a great menu planner printable here. Good luck!

      December 23, 2010

      Red Velvet Cheesecake


      If you are looking for an extra special dessert to bake for Christmas dinner - or any other occasion during the year, I've got you covered.  Heck, this is so good though, why just serve it on special occasions?  

      This is one cake that you just can't say 'no' to.  My husband can't even say 'no' to a second (or third) piece.  I'm serious ya'll - delicious doesn't even begin to describe it.  It is out of this world!


      It is a composed of a layer of red velvet cake followed by a layer of cream cheese frosting - a layer of cheesecake - more cream cheese frosting - another layer of red velvet cake, then finished off with what else but more cream cheese frosting.  


      And, it contains vegetable oil, so that makes it good for you, right?  Don't answer that.  

      Disclaimer: This cake may cause temporary moaning, & uncontrollable urges to slice another piece.


      Red Velvet Cheesecake

      Ingredients:


      For the Cheesecake Layer:


      • 2 & 1/2 8oz packages of cream cheese (20oz), room temperature
      • 3/4 cups sugar
      • 2 eggs
      • 1/2 cup sour cream
      For the Red Velvet Cake  :

      • 2 1/2 cups self-rising flour
      • 3 tablespoons cocoa
      • 1 1/2 cups granulated sugar
      • 3 eggs
      • 1 1/2 cups vegetable oil
      • 1 teaspoon vinegar
      • 1 (1-ounce) bottle red food coloring
      • 1 teaspoon vanilla
      • 1 cup buttermilk
      For the Cream Cheese Frosting:

      • 4 (8oz) packages of cream cheese, softened
      • 2 sticks of butter, softened
      • 4 cups confectioners sugar
      • 2 teaspoons vanilla extract

      Instructions:

      Preheat oven to 325 degrees. Beat cream cheese with an electric mixer until fluffy. Gradually add sugar, beating until nice and creamy.  Beat in eggs, one at a time, scraping down side of bowl after each addition. Beat in sour cream.

      Put a large baker with hot water in the bottom rack of your oven.  Pour the cheesecake batter into a 9 inch springform pan.  Bake on middle rack until just set in center, about 45 minutes - 1 hour. Remove pan from oven; let cool completely. Wrap in plastic wrap and freeze for a few hours, or until frozen.  

      Make the Cake

      Preheat oven to 350 degrees F. Grease and flour 2 (9-inch) round layer cake pans, or spray with Bakers Joy.

      Sift flour and cocoa together. Beat sugar and eggs together in a large bowl.
      In a separate bowl mix together oil, vinegar, food coloring, and vanilla. Add to the bowl of eggs and sugar and beat until combined.

      Add the flour mixture and the buttermilk to the wet mixture by alternating the buttermilk and dry ingredients. Start with the flour and end with the flour.

      Pour batter into pans. Tap them on the table to level out the batter and release air bubbles. Bake for 25-28 minutes or until a toothpick inserted near the middle comes out clean.  Be careful not to over bake or you'll end up with a dry cake.
       
      Let layers cool on a wire rack for about 10 minutes before turning out of pan.  Let cool completely before frosting.

      Make the Frosting

      Beat cream cheese, butter, and vanilla together in a large bowl with an electric mixer until combined.  Add sugar and beat until frosting is light and fluffy.

      Assemble the Cake

      Layer the cake as follows.  One red velvet layer, followed by frosting - then add the cheesecake layer.  Spread more frosting on the top of the cheesecake, then top with the last layer of red velvet cake.  Finish the whole thing off with more frosting.  Be generous with the icing!

      Refrigerate until ready to serve. 


      December 20, 2010

      Ranch Oyster Crackers


      I make these frugal & easy seasoned crackers each year around Christmas, and a few times throughout the year.  You can whip them up in minutes, & are wonderful to bag up for gifts or nibble on while waiting for Christmas dinner to be served.


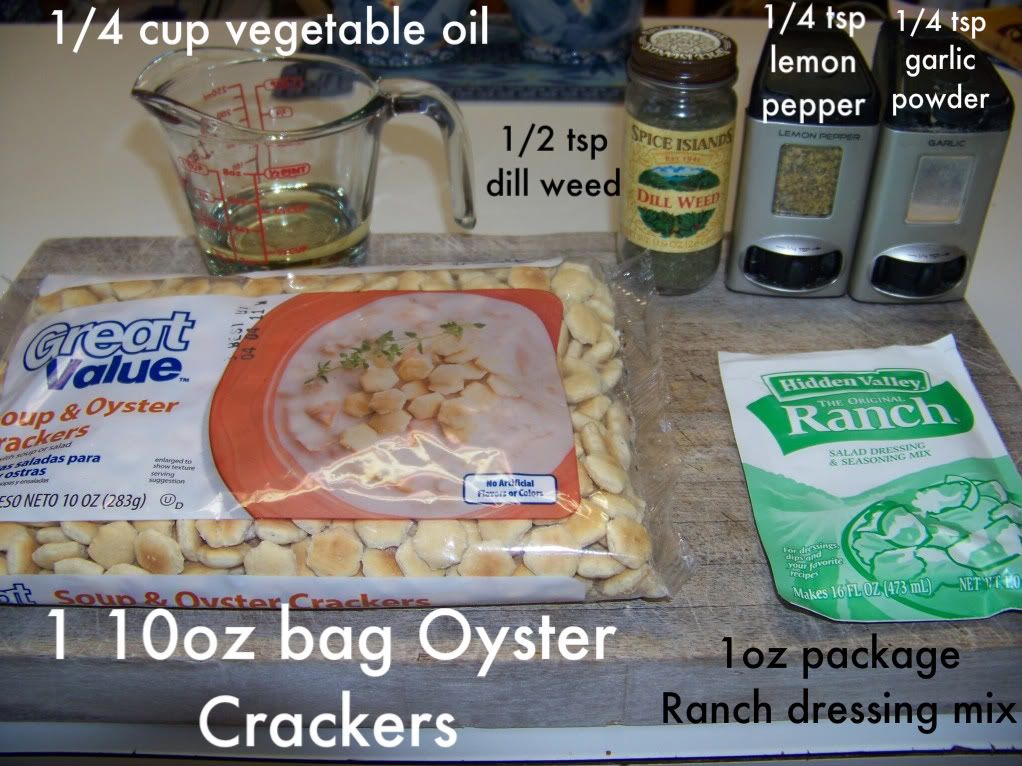
      Here is what you need:


      Whisk the seasonings in with the oil in a large bowl.


      Pour in the bag of oyster crackers & toss to combine.


      Spread out the crackers on a large baking sheet & bake in an oven preheated to 250 degrees for 15-20 mins, stirring occasionally.


      Let cool before transferring to a bag or container.


      Ranch Oyster Crackers

      Ingredients:
      • 1 (1 ounce) package ranch dressing mix
      • 1/2 teaspoon dried dill weed
      • 1/4 cup vegetable oil
      • 1/4 teaspoon lemon pepper 
      • 1/4 teaspoon garlic powder 
      • 10oz package oyster crackers

      Instructions:

      1. Preheat oven to 250 degrees F (120 degrees C).
      2. In a large mixing bowl, combine ranch dressing mix, dill weed, vegetable oil, lemon pepper, and garlic powder. Mix well. Add oyster crackers to the mixture and mix to coat the crackers. Pour the crackers onto a cookie sheet.
      3. Bake for 15 to 20 minutes, stirring gently halfway through the baking time.


      Photobucket

      December 19, 2010

      Maple Cinnamon Rolls


      This is a repost from the summer.  I make these cinnamon rolls every Christmas, so I had to share them again for this time of year!


      My family & I love cinnamon rolls. I mean, what's not to love? Cinnamon rolls ARE love. We all need love! Especially when that love comes in ooey gooey cinnamony goodness!

      Today, I decided to make up a batch of cinnamon love. I hope this inspires you whip up a batch of cinnamon love for your family & friends too!

      First, take out a medium saucepan. Add 4 cups of milk, 1 cup of vegetable oil, & 1 cup of sugar on medium heat. Let it cook for about 10-15 minutes, but don't let it come to a boil! You will end up with a nasty overflowing mess on your stove!


      Now, sprinkle on 2 little packages of yeast & let it sit for a couple minutes.


      Put 9 cups of self rising flour in a large bowl. I use my 6 quart KitchenAid mixer bowl, & it works perfectly. Mix in the milk/yeast mixture.


      Cover with a clean kitchen towel, & place in a warm place for an hour or two for the dough to rise.


      Now that your dough has risen, divide it in half. Take that half and roll it out into a large rectangle. Then assemble your filling ingredients! You will need 2 sticks of melted butter, 1 cup of sugar, & 4 tablespoons of cinnamon.


      Now, pour on half the melted butter & then half the cup of sugar. Mush it around a little with your fingers to help it absorb everything good. Then pour on the other half of the butter & sugar - and sprinkle on the cinnamon.


      Roll up from the long ends & make you an extremely long roll of raw goodness!


      Slice the log into 1.5 inch (or so) rolls.


      Pour a couple tablespoons of melted butter into a baking dish & place your cinnamon rolls in them - careful not to crowd them now! Cover with a towel & let them sit for about 30 minutes. Now do the exact same process with your other half of dough.

      Heat up your oven to 375 & bake your cinnamon rolls for 15-18 minutes. While they are baking, get your icing ready. In a large bowl, whisk together 9 cups of confectioners sugar, 3/4 cup milk, 6 tablespoons melted butter, 4 tablespoons coffee, & 1 or 2 tablespoons of maple extract or flavoring.


      Pour the icing on top of the warm cinnamon rolls.


      Now, you could sit here & drool over these photos ... OR you could whip up some yourself! 


      Maple Cinnamon Rolls


      Ingredients:


      For the cinnamon rolls:
      • 4 cups milk
      • 1 cup Vegetable Oil
      • 1 cup Sugar
      • 2 packages Yeast
      • 9 cups self rising flour
      • 4 sticks of Melted Butter
      • 2 cups Sugar
      • 8-10 tablespoons of cinnamon
      For the Maple Icing:
      • 9 cups powdered sugar
      • 2 teaspoons Maple Flavoring or Extract
      • 3/4 cup Milk
      • 1/4 cup Melted Butter
      • 1/4 cup Coffee
      Instructions:
      Mix the milk, vegetable oil and sugar in a pan. “Scald” the mixture (heat until just before the boiling point). Turn off heat and let it sit til room temperture - about an hour. Sprinkle in both packages of Active Dry Yeast. Let sit for a couple minutes Then add the 9 cups of self rising flour. Stir mixture together. Cover and let rise for 2 hours in a warm place.

      Sprinkle rolling surface generously with flour. Take half the dough and roll into a large, long rectangle. Drizzle 3/4 to 1 cup melted butter over the dough. Sprinkle 1 cup of sugar over the butter followed by a generous sprinkling of cinnamon.

      Begin rolling the dough from the long end into an extremely long roll. Try to keep the roll pretty tight, & pinch the seams when done to hold it together.

      Pour a tablespoon or two of melted butter into your baking dish.  I use 4 large baking dishes.  Cut your rolls 1 - 1.5 inches thick and lay them in the buttered pans.
      Repeat this process with the other half of the dough. Let the rolls rise for about 30 minutes, then bake at 375 until light golden brown, about 16 to 18 minutes.
      For the icing, whisk together all ingredients listed and mix until smooth. Generously pour over the warm rolls.

      December 16, 2010

      Ultimate Double Chocolate Cookies


      I saw these cookies in a magazine advertisement from Ghiradelli, & I just HAD to bake them.  And, am I glad that I did!  These are one of the richest & best tasting cookies I have ever made.  You just have to give them a try! 


      Here is what you need:


      In the double boiler set up over hot water, melt the 60% cacao chocolate & stick of butter.


      In a large bowl, beat eggs & sugar together until until thick.


      Stir in the chocolate mixture.


      Stir in the flour & baking powder.


      Mix in the chocolate chips & walnuts.


      Using a sheet of plastic wrap, form dough into 2 logs - each about 2 inches in diameter & 12 inches in length.  Use the plastic wrap to roll into log shape & wrap tightly.  Refrigerate for at least 1 hour - I did it overnight.


      After the chilling is done - preheat the oven to 375 degrees.  Cut the cookie dough rolls into 3/4 inch slices.  Place slices 1.5" apart on a greased cookie sheet.


      Bake for 12 to 14 minutes.


      Recipe

      Ultimate Double Chocolate Cookies
      Yield: 24 cookies

      Ingredients:
      • 12 ounce(s) Semi-Sweet Chocolate Chips
      • 10 ounce(s) 60% Cacao Bittersweet Chocolate Chips
      • 6 tablespoon(s) unsalted butter
      • 3 eggs
      • 1 cup(s) sugar
      • 1/3 cup(s) all-purpose flour
      • 1/2 teaspoon(s) baking powder
      • 1 cup(s) chopped walnuts
      Instructions:
      In double boiler over hot water, melt bittersweet chocolate chips and butter. In large bowl with electric mixer or whisk, beat eggs and sugar until thick; stir into chocolate mixture. In small bowl, stir together flour and baking powder; stir into chocolate mixture. Gently mix in semi-sweet chocolate chips and walnuts. Using a sheet of plastic wrap, form dough into two logs, each 2 inches in diameter and about 12 inches long. As dough will be quite soft, use plastic wrap to hold dough in log shape. Wrap tightly; refrigerate at least 1 hour or until firm. Heat oven to 375°F. Unwrap dough; with sharp knife, cut into 3/4-inch slices. Place slices 1 1/2 inches apart on greased or parchment-lined cookie sheet.
      Bake 12 to 14 minutes or until shiny crust forms on top but interior is still soft. Cool on baking sheet; store in airtight tin up to 1 week.

      .

      --> Related Posts Plugin for WordPress, Blogger...